February 2013 - UNLOCK TRICKS
Headlines News :

Support Us

How to Run Android on your Netbook or Desktop

Written By Unknown on Tuesday, February 26, 2013 | Tuesday, February 26, 2013


Android gained success is a short span, Android being the Most used mobile platform with more than a million active apps. Android powers million's phones, Tablets and Now Netbooks and Desktops. Yes, You heard me right.

You can Also Run Android on you Netbook or Desktop. In this post, I'll show you How to Run Android on your Laptop or Netbook.


Things You'll Need


Before you start reading this Tutorial, Make sure that you gather all the required stuff.
  • A USB Drive or Pen Drive with 256 MB+ Space. (Or CD)
  • A Compatible Netbook or Desktop (Check Here)
  • Some basic Computing skills
  • And Of Course - This Guide

Steps for Installation


Follow this Step by step guide for Installing Android on your device. It may take about 30 minutes for Installation.

Preparing the USB Drive 


Step 1
Format your USB Drive completely, Back up your Important data first.


Step 2
Now Go to this link http://www.android-x86.org/download and Find the Android version compatible with your device. Once you find it Click on View and Download it.


Step 3
Now let the Android-x86 download and meanwhile Download UNetbootin, Click Here to download. This software will help you unpack the .iso to USB drive and make it a bootable device.


Step 4
Once both files get downloaded, Open UNetbootin. Tick the Diskimage Butto. 


Now from the Dropdown list select ISO. Browse to android-x85 file by pressing '...' button. Now do the rest of settings and Press OK.


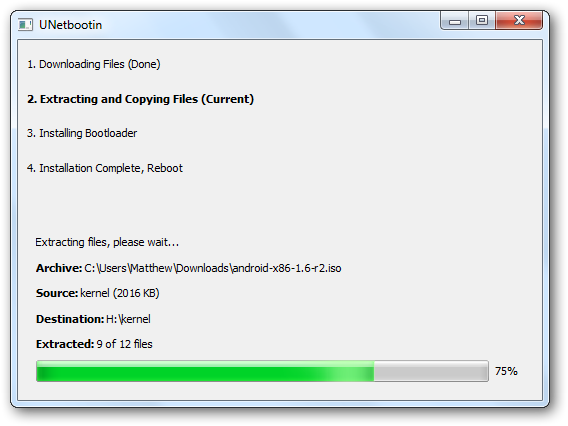
Now Let UNetbootin load files to you USB Drive. Once file loading finish, Do a Reboot if you want to Run android on same device. If you want to Run android on other device then exit.
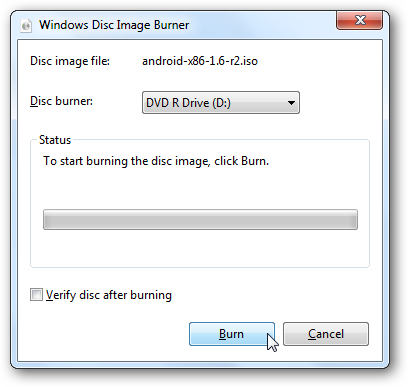
NOTE: If you want, You can burn the android-x86 iso on CD.


Installing Android on Computer

Now that you've prepared you USB or CD, Next step is Installing it on your Computer or Laptop or Netbook. 

Step 1
Plug your USB in the device you want to install Android and then Reboot. 


Step 2
On Startup, You Computer will ask you Booting device. Select your USB drive for booting. 

(For Some computers you may need to press F2 or F10 key for booting process, depending upon your computer select to boot from USB)


Once you Computer Starts Booting from USB, It will show an Installation setup. 

Step 3 
Select Live CD – Run Android-x86 without installation. Option from the Installation setup.

Step 4
Wait for few minutes, The Setup will boot Android. After few minutes, You'll see Android Desktop.


Now Enjoy Android on your Netbook, Laptop or Computer. Now you can Install Android Applications on your Device. Hope you enjoyed the Tutorial, Please share it with your friends and Please do leave a comment down.

Now Finally You Can Run Android on Your Netbook, Laptop

How to Turn Off Low Disk Space Warning in Windows XP - Tutorial


low disk space warning windows xpWhenever Windows detects that one of your drive has little free space, It starts giving a Warning 'Low Disk Space' Which sometimes is very annoying. Today I'll tell you a trick to Turn off this Warning in Windows XP. Its very simple and below is Step by Step Tutorial with Screen shots.


How to Turn Off Low Disk Warning

Step 1: From your Desktop, Go to START Menu and click on RUN.

windows start menu

Step 2: In Run prompt, Type 'REGEDIT' and then click OK. This will Open Windows Registry Editor.


windows run regedit

Step 3: Go to HKEY_CURRENT_USER

windows registry editor


Step 4: Now Go to Software/Microsoft/Windows

windows registry editor


Step 5: In Windows, Go to CurrentVersion/Policies/Explorer.

windows registry editor


Step 6: No on Right pane, Right Click > New > DWORD Value.

windows registry editor

Step 7: Name it as 'NoLowDiskSpaceChecks'

windows registry editor


Step 8: Double click on 'NoLowDiskSpaceChecks' and enter value '1'

windows registry editor 

Step 9: Click on OK 

How to use USB Pen Drive as RAM - Tutorial


use usb pendrive as ramAs Days are passing technology is getting higher and higher and people are confused what to buy. Any latest device, gadget bought today will become old within a couple of months, What to do? We can't keep on buying new things every now and then. 
  Nowadays Games, Softwares take a lot of memory for operation and our old devices can't run them smoothly because of hardware issues. Today I'll tell you 'How to use your USB Drive as RAM'. This will let you run programs better than before and also improve computer speed.

How to use USB Drive as RAM

Here is a Step by Step guide to transform your USB Drive to RAM. This will improve operation of programs on your desktops / laptops.

Things You'll Need:

  • USB Pen drive (minimum 2GB)
  • A Computer or laptop.
  • Some basic knowledge.

Step 1: Plug your USB Drive into your PC / Laptop. It will be recognized automatically.


usb pendrive as ram tutorial

Step 2: Right click on My Computer > Properties.

my computer properties

Step 3: Go to Advanced tab

my computer system properties

Step 4: In Performance section, Click on Settings > Advanced tab.


Performance Options

Step 5: Under Virtual memory, Click on Change

virtual memory

Step 6: Select your USB Drive.

virtual memory my computer

Step 7: Click on Custom Size and enter the size (in MB) you want the USB RAM to be (example: 2000 MB = 2 GB).

virtual memory my computer

Step 8: Click on Set > Ok and Restart your computer.


After Restarting your computer you'll see noticeable improvement in speed. Please leave your comments below if you need help. 

How to Check If Your iPhone is Factory Unlocked for Free


You have an iPhone but you don't know whether it is Factory Unlocked or carrier locked. Many time in some situations like buying a used iPhone or jailbreaking / unlocking, you'll need to know if your iPhone is free from carrier and it can run sim cardof all carriers. Many online services provide this information but it is not free, they charge a certain amount of fee for providing such information especially Unlock status, But don't worry today I'll show you a way to know if the iPhone is Factory Unlocked or Locked and this free.

how to check if iphone is factory unlocked


Steps to Check Unlock Status

Step 1: Go to this Website 

Step 2: Enter your 15 digit IMEI Number 

how to check if iphone is factory unlocked

(If you don't know How to get IMEI number then from your iPhone, Go to Settings > General > About and scroll down for imei)

how to check if iphone is factory unlocked

Step 3: Now hit Enter and wait till it displays information.

Step 4: After some time it will display IMEI info of your device.

how to check if iphone is factory unlocked

Compare the Device ID1 with your IMEI and Device ID2 with your Serial number and make sure it matches. If your Device ID1 and Device ID2 does not match with IMEI and Serial number then please contact Apple and ask them if your product is original or fake.

Hope this post was helpful, Let me know by leaving comments down below.
  

iPhone Factory Unlock: AT&T and Apple!!


The majority of iPhone's owners are looking for a way to unlock their iDevice to be able to use it in any company they desire which is useful for users that travel out side the US. This is how the whole "Jailbreak Community" was created anyways, a kid (George Hotz) wanted to use his brand new iPhone with another company that was cheaper than AT&T (if I'm not mistaken it was T-Mobile). Well this is always a hustle since Jailbreaking seems to be a easier thing to do since there is a Jailbreak tool for almost any kind of iDevice out there         (except the Apple TV 3 Gen.) than there are unlock tools for any basebands.
Anyhow this kind of unlock forces the iDevice to be Jailbroken and then unlock in many of the cases even though we have now the Gevey Sim Card or similar Sim Cards that the device does not have to be Jailbroken. People are always looking for devices that are Factory Unlocked, which are the ones that don't need any kind of tools or you have to be worry about updates damaging your unlock. This devices are hard to find and if you have the luck to find them, they may cost way more than a regular iPhone.

For those of you that have acquired your iPhone thru AT&T which is my case and have had your iPhone for 2 years. Then you are entitle of getting your iPhone Factory Unlock for free like I did. I heard that I could do this by calling the tech support at AT&T but was reluctant to do this. A couple of days ago I wasn't doing anything and decided to call them, and asked them for the unlock. They check my account and told me that I qualified for the unlock. The representative asked for my IMEI number and even though I had change the phone like twice and they didn't have the same IMEI number on my account they were able to change it, and sent me an email with instructions.
Email received from AT&T.
The instructions were very simple: BackUp and Restore you iPhone. Those were basically the instructions. The email said that after that I would received a message from iTunes stating that my iPhone was Unlock. Eventually I did all this and it worked, I did receive the message that stated that my  iPhone was unlock. The representative did tell me that the unlock could take up to 24 hours even though I received the message from iTunes.
Message form iTunes!!


This is no the best way to get your iPhone Factory Unlock since you must have a contract for 2 years and then your contract have to expired in order for you to have a Factory Unlock. I just thought that they are many people just like me that didn't know this and their contracts have expired so we have the opportunity to do this.

Update 9/26/12: if you have an iPhone and are in need of an unlock, and you are still in contract for another year or so. The best way to unlock it is by contacting @chronic via his business email will@chronicwire.com and give him your IMEI number as well as the company your phone came from. He will send you an invoice from Paypal with the price you must paid. He is very reliable and I have done my iPhone 5 and iPhone 4 with him. The prices varies depend on your carrier. The process take around 1-3 days to finished, please if you do use Chronic to do your unlock please be patient because he is handling all the emails by himself, thanks. I think this is the best way to unlock your iPhone if you are still under contract or just bough a brand new iPhone 5.

How to bypass Samsung Galaxy S3 Verizon activation screen

The following is a guide for you to get past the Samsung Galaxy S III Verizon activation screen without an active Verizon sim card.
the guide below, you may skip the activation and get to the main menu of the phone, where you can play with all features without
activating the phone with Verizon.

If you do not have a Verizon sim card in the phone, the activation screen will be stuck when you press the next button. With

How to fix Blackberry Bold 9780 White Screen


Below is a simple fix for blackberry bold white screen problem. I tried it and managed to resurrect several blackberry bold 9780 phones. Let me know if it works for you.

1) Turn on the phone and wait for several minutes until it fully boots up.
2) Press the lock button + button P + lower right corner of the screen simultaneously.
3) It may require to do #2 several times in order for it to work.
The reason being is that the LCD connector may be loose. The connector/cable is directly beneath the p key. By pressing the key and lower
right corner of the screen, it helps to align them. Pressing the unlock button is just to reset/turn on the screen to see if it fixes the white screen.
Good luck and leave a comment whether this works for you!

Unlock your iPhone 4S/4 for Free - Act Fast!


Unlocking means you can use your phone with another carrier (especially useful when you travel to save on expensive roaming charges) Not sure if this is just a glitch so probably won't last long so head over here to the AT&T unlock portal to unlock your iPhone even if it's still under contact. I recently unlocked my iPhone 4 because it was out of contract (I had it more than 2 years) but now it appears you can unlock your iPhone even if it's still under contract.


Setup, Install and Run Ubuntu/Linux on Nexus 7 Android Tablet - Tutorial and Guide


One of the main advantage of having Google's Android Smartphone and Tablets over Apple's Smartphone and Tablets is that you can fully customized your Android device the way you want and the way you want to work with it without any fear including Android's keyboard changing method, launcher, default browser or flashing a new recovery like ClockworkMod. shifting to a new custom ROM and now installing Ubuntu Linux OS on Android. Previously we had also shared the Tutorial and Guide of Installing Ubuntu Linux on Android's Galaxy S III smartphone, you can check the tutorial if you have Galaxy S III Smartphone and now we are going to share the Tutorial and Guide of Installing Ubuntu Linux on Google's Nexus 7 Android Tablet. If you have Nexus 7 Android Tablet than you would love to have Ubuntu Linux Operating System running on Android Tablet and you can also Experience full Features and Programs of Ubuntu Linux OS into Google's Nexus 7 tablet. 

Ubuntu on Google Nexus 7

The good news is that soon users are going to see Ubuntu for Android devices in future but in the meantime you can install this inelegant and working solution to Setup,Install and Run Ubuntu/Linux on Nexus 7 Android Tablet. Ubuntu LinuxOperating System can be integrated into any Android smartphone and tablet device with a possibility of having a full-fledged desktop operating based on Linux after unlocking its bootloader. Setup and Installation of Ubuntu Linux Operating System on Android device is not easy thing so users have to be careful when implementing following Guidelines and Tutorial of Installing Ubuntu/Linux on Nexus 7Android Tablet. Installing, Testing and Setup of Ubuntu Linux OS on Nexus 7Android Tablet is quite lengthy and risky and users have to be careful when integrating it. So install and try it at your own risk and we at TechGlobeX are not responsible for any damage incurred to your device as a result of following this tutorial and guide and make sure that take a full back-up of your Google Nexus 7 tablet with ClockworkMod beforehand so you can switch back to your current setup in case things go wrong.

Necessary Requirements before Installation of Ubuntu/Linux OS on Google Nexus 7 Tablet:
  • Your PC/Laptop must be running Ubuntu 12.04 Precise Pangolin or later, this tutorial won't work if your computer is running OS X or Windows.
  • Google Nexus 7 tablet must have an unlocked bootloader.
  • You must have Ubuntu 12.04 Precise Pangolin on your PC/Laptop hard-disk.
  • Your must have he Ubuntu Nexus 7 Installer.
  • Unlock the bootloader of your Nexus 7 by using All-in-one Nexus 7 root toolkit. While you’re at it, root your Nexus 7 and flash ClockworkMod Recovery as well.

How to Setup, Install and Run Ubuntu/Linux on Google Nexus 7Android Tablet?

First you should read the guidelines and instructions involved in Development and Testing of Ubuntu/Linux OS for Nexus 7 here. Now follow the following Steps and Guidelines to Setup, Install and Run Ubuntu/Linux on Google Nexus 7 Android Tablet.

Step 1: Launch Ubuntu’s Terminal app and enter the following commands one by one:

sudo add-apt-repository ppa:ubuntu-nexus7/ubuntu-nexus7-installer 
sudo apt-get update 
sudo apt-get install ubuntu-nexus7-installer

Step 2: Connect your Nexus 7 to your PC using a USB cable.

Step 3: Boot into fastboot mode.

Step 4: Turn off your Nexus 7. Press and hold Volume Up + Volume Down + Powerbuttons until you see the Android mascot.

Step 5: Ensure no other USB-based devices are connected to your PC. Search forUbuntu Nexus7 Installer from the Ubuntu dashboard. Launch it. Follow the on-screen instructions. Congratulations!! You're done and now you should see Ubuntu/Linux OS Contents on your Android's Google Nexus 7 tablet.
Ubuntu Linux on Google Nexus 7

Troubleshooting: The whole tutorial and method should not take more than 20 minutes but if you're still getting any problem or error when implementing the above methods than you should refer to this official link.


BEWARE: The above Content and Tutorial was provided by redmondpie and it’s purely for informational purposes only and we at TechGlobeX are not responsible for any damages, software and hardware loss occurs when implementing above method and procedure. Downloading and installing cracked apps  are illegal. The whole purpose behind above tutorial and guidelines is for app testing and we encourage peoples to purchase original app directly from Google Play App Store.

Download and Install Android 4.1.2 Jelly Bean On Galaxy S3 SGH-I747 CM10 AT&T - Tutorial & Guide


How to: Download, Flash, Root and Manually Install Android 4.1.2 CM10 Jelly Bean Update On AT&T Samsung Galaxy S3 SGH-I747 - Tutorial & Guide

AT&T Samsung Galaxy S3 SGH-I747 Smartphone comes with pre-installed AndroidOS, v4.0 (Ice Cream Sandwich) Firmware so if you're owner of AT&T Samsung Galaxy S3 SGH-I747 and running an old Android Firmware v.4.0 (Ice Cream Sandwich) than you can Download and Manually Install Latest Android 4.1.2 Jelly Bean Custom ROM Update based on CyanogenMod 10 (CM10). Android 4.1.2 Jelly Bean is officially available for AT&T Samsung Galaxy S3 SGH-I747 Smartphone, users just need to have ClockworkMod 10 (CM10) Recovery installed in order toInstall and Update Custom ROM Firmware from Old Android Firmware v.4.0 (Ice Cream Sandwich) to Latest Android v.4.1.2 (Jelly Bean) On Samsung Galaxy S3 SGH-I747.
Samsung Galaxy S3 SGH-I747

Android v.4.1.2 Jelly Bean Update for AT&T Samsung Galaxy S3 SGH-I747 will provide several new features, bugs fixes and performance boost in hardware and software to your Android device. In this post we will provide you Tutorial and Guide to Manually Install Android 4.1.2 CM10 Jelly Bean Update On AT&T Samsung Galaxy S3 SGH-I747 with easy steps and procedure. First you will need to take a Full Back-Up of your AT&T Samsung Galaxy S3 SGH-I747 Smartphone Data on your Laptops or PC's to avoid any conflict or damage in processing because we are not responsible for any damages, software and hardware loss occurs when implementing this tutorial and guide. So let’s begin the Tutorial and Guide to Download andManually Install Android 4.1.2 CM10 Jelly Bean Update On AT&T Samsung Galaxy S3 SGH-I747 Smartphone.

How to Download, Flash, Root and Install Android 4.1.2 Jelly Bean On Samsung Galaxy S3 SGH-I747 AT&T Smartphone:
  • Before you start the procedure you need to fully charge your Samsung Galaxy S3 SGH-I747 battery and it should be 80-85% charged.
  • You will also need to enable USB debugging mode which helps you to connect your Android phone via PC.
  • Your phone should be factory unlocked. 
  • Your phone should be rooted and have ClockworkMod Recovery installed. 
Now Just follow our Tutorial and Guide to successfully Download, Flash, Root and Manually Install Android 4.1.2 Jelly Bean On AT&T Samsung Galaxy S3 SGH-I747 Smartphone.

Step 1: Download Android 4.1.2 CM10 Jelly Bean ROM and Google Apps for Samsung Galaxy SIII SGH-I747 to your computer.
Step 2: Connect and mount your AT&T Galaxy S3 USB memory on your computer using the USB cable.
Step 3: Now copy/paste the downloaded Android 4.1.2 ROM zip and Google Apps files to your SD card. Make sure the files are in the SD card root (not in any folder).
Step 4: Then turn OFF your phone and disconnect from the USB cable.
Step 5: Now to get in the Recovery Mode.Switch ON the phone while pressing and holding Volume Up + Home + Power buttons together.
Step 6: In ClockworkMod recovery, perform a full data wipe first. Then scroll down to “flash zip from SD card” and press the Power button to select it.
Step 7: Press the Power button again and select “choose zip from sdcard”.
Step 8: Now using your volume keys, navigate to the Android 4.1.2 ROM zip file that you copied to your SD card and select it using the Power button. Confirm the installation on the next screen and the installation procedure should start now.

NOTE: Repeat this step for the Google Apps zip file as well.

Step 9: After the installation completes, go to “+++++Go Back” and reboot the phone by selecting “reboot system now” from the recovery menu. The phone will boot now and it might take about 5 minutes to boot on your first time. So, please wait.Congratulations!! You have successfully installed Android 4.1.2 CM10 Jelly Bean Update On  AT&T Samsung Galaxy S3 SGH-I747, for verification Go to Settings > About.


BEWARE: The above Content and Tutorial was provided by teamandroid and we atTechGlobeX don’t support or promote piracy in anyway. This article is purely for informational purposes only and we are not responsible for any damages, software and hardware loss occurs when implementing above method.Downloading and installing craked apps are illegal. The whole purpose behind above tutorial and guidelines is for app testing and we encourage peoples to purchase original app directly from App Market.

Download PC Suites & USB Drivers for Android Smartphones & Tablets (ADB and Fastboot Drivers)


PC Suites Software and USB Drivers for Android Smartphones and Tablets is very useful and important for every Android device user because it helps Android device user to transfer data from its computer into their Android device phone storage memory or from Android device to its computer's hard-disk. USB Drivers for Android smartphones and tablets also requires to connect Android phone to the PC while Android PC Suites Software helps Android device user to transfer Media Files, Music Files, Video Files, Docx Files or Installing Android Applications, Android Games or any other personal data from PC to Android phones or tablets this also includes, using the Android device for SDK Development which requires ADB and Fastboot Drivers which help users in Android App Development process. So in this post we are sharing Direct Download Links of PC Suites Software and USB Drivers (ADB and Fastboot Drivers) for Android Smartphones and Tablets from Google Nexus, Samsung, HTC, Motorola, Huawei, LG, ASUS, SONY, ZTE, DELL, Fujitsu and Intel Android Device Manufacturers. You can Download PC Suites Software and USB Drivers (ADB and Fastboot Drivers) for Android Smartphones and Tablets from links mentioned below.

PC Suites and USB Drivers for Android

Generally PC Suites Software and USB Drivers (ADB and Fastboot Drivers) for Android Smartphones and Tablets can be downloaded through Official websites of device manufactures but many users find difficulty when downloading PC Suites Software and USB Drivers for their Android device from official websites so in case you're finding difficulty to find Relevant PC Suite Software and USB Drivers for Android Smartphones and Tablets or getting some kind of error when downloading from official websites of your device manufactures than you can manually Download PC Suites Software and USB Drivers (ADB and Fastboot Drivers) for Android Smartphones and Tablets from Google Nexus, Samsung, HTC, Motorola, Huawei, LG, ASUS, SONY, ZTE, DELL, Fujitsu, Intel Android Device Manufacturers below. These PC Suites Software and USB Drivers for Android Smartphones and Tablets are only compatible with Windows operating system which includes Windows XPWindows VistaWindows 7 and Windows 8 OS x86 (32-bit) and x64 bit versions.

Download PC Suites Software and USB Drivers (ADB and Fastboot Drivers) for Android Smartphones and Tablets from Google Nexus, Samsung, HTC, Motorola, Huawei, LG, ASUS, SONY, ZTE, DELL, Fujitsu, Intel Android Device Manufacturers  - Direct Download Links

We have gathered and generate list of all the major Android smartphones and tablets manufactures which links to their USB Drivers and PC Suites Software (which also includes the USB Driver) webpage. Users can directly Download PC Suites Software and USB Drivers (ADB and Fastboot Drivers) for Android Smartphones and Tablets from given links. Following PC Suites Software and USB Drivers for Android Smartphones and Tablets are only compatible with Windows operating system.
  • Download PC Suite and USB Drivers for Google Nexus Android device. (Click here for Info & Details)
  • Download PC Suite and USB Drivers for HTC Android device.(HTC Sync)
  • Download PC Suite and USB Drivers for Motorola Android device. (Motorola Device Manager)
  • Download PC Suite and USB Drivers for LG Android device.
  • Download PC Suite and USB Drivers for SONY Android device.
  • Download PC Suite and USB Drivers for ZTE Android device.
  • Download PC Suite and USB Drivers for DELL Android device.
  • Download PC Suite and USB Drivers for Fujitsu Android device.
  • Download PC Suite and USB Drivers for Intel Android device.

Save & Open Safari Webpages as PDF Files in iPhone, iPad, iPod, Dropbox, iFile


How to Save and Open Safari Webpages as PDF Files in iPhone, iPad, iPod and Upload to Dropbox and iFile at Free of Cost - Tutorial and Guide

If you are an Apple Safari web browser user and using Safari as a primary Web Browser on your iPhone, iPad and iPod devices than you will be pleased to know that there's is a tweak which helps you to Save and Open Safari Webpages as PDF Files in iPhone, iPad and iPod and also helps you to Save and Upload Safari Webpage PDF Files to Dropbox and iFile at Free of Cost. This tweak will helps those Safari browser users who frequently save webpages and web articles in Safari browser  in iPhone, iPad, iPod and wants to open and read that webpages in Personal ComputersDropbox or iFile accounts without having an internet connection. Sometimes internet connection is required to open and read Safari Webpages but with PDF Files Format you don’t need to have an internet on your iPhone, iPad and iPod and you can even Save and Upload Safari's Webpage PDF File to Dropbox and iFile Account at Free of Cost in offline mode and later you can read your PDF File format on your Mobile phone and PC. So let’s start the Tutorial and Guide on How to Save and Open Safari Webpages as PDF Files format in iPhone, iPad, iPod and Upload to Dropbox and iFile Account at Free of Cost without internet connection in offline mode.
Safari Webpages as PDF Files

In our first tutorial method we will try to Save Safari Webpages as PDF Files in iPhone, iPad and iPod and then we will guide you on how to Save and Upload Safari Webpages PDF File into Dropbox and iFile Account at Free of Costwithout having an internet connection in offline mode. After saving Safari webpages asPDF Files in iPhoneiPad, and iPod you can also Save and Upload PDF Files into Dropbox and iFile Account, after that you can access, open and read respective PDF Files on your other personal computers through Dropbox or iFile account support. This tweak doesn't need any third-party iOS Apps installation and it’s also doesn't required any internet connection. Now follow our Tutorial and Guide below.

How to Save and Open Safari Webpages as PDF Files in iPhone, iPad and iPod for Free?

Step 1: First open "Safari Web Browser" on your iPhone, iPad and iPod and navigate to your respective "Webpage or Website".

Step 2: Now Click on the "Share" Button (Available in Arrow Shape) from the Safari Menu below.

Step 3: After that, Click on the "Print" Button from the Menu.

Step 4: Now Click on "PDF" Button on upper right side to Save the webpage in "PDF File Format".

Step 5: Your Safari Webpage has been saved into PDF format, now you can open it from your desired folder You're Done!!

Safari PDF Files Format

How to Save and Upload Safari Webpage PDF Files to Dropbox and iFile Account for Free?

Step 1: After saving your Safari Webpage as PDF File format in iPhone, iPad and iPod, you can now open and view it in Dropbox or iFile Account. First Click on "Open in... " in the upper left corner of your Safari Web browser.

Step 2: Now Select the "Dropbox or iFile" option from Menu and Click on it.

Step 3: After that, Click on "Save" Button on upper right corner to Save and Upload the PDF file in Dropbox and iFile account.

Step 4: Now you can open, view and read "Safari Webpage PDF Files" from your personal computers through Dropbox and iFile Account for Free without having an internet connection. You're Done!!
?max-results=10">Label 2'); document.write("?max-results="+numposts2+"&orderby=published&alt=json-in-script&callback=showrecentposts2\"><\/script>");
 
Support : Creating Website | Johny Template | Mas Template
Copyright © 2011. UNLOCK TRICKS - All Rights Reserved
Template Created by Creating Website Published by Mas Template
Proudly powered by Blogger